Analyze Graphs
The Analyze Graphs window helps you figure out how many armies you should attack with. It is divided into two graphs: the Probability Graph and the Army Loss graph. To find this window, start to issue an attack and click the Analyze button.
To understand these graphs, you should first understand the combat basics.
The first thing you should do after opening the Analyze Attack window is to set the number of armies you expect the defender to have in the text box at the top. This number defaults to the number of defenders you opened the dialog from, but remember that the defender gets a chance to add armies before the attack takes place, so you may wish to predict how many your opponent will add. When attacking neutral, you can be assured the numbers here will be accurate. After changing this number, click the Recalculate button.
Probability Graph

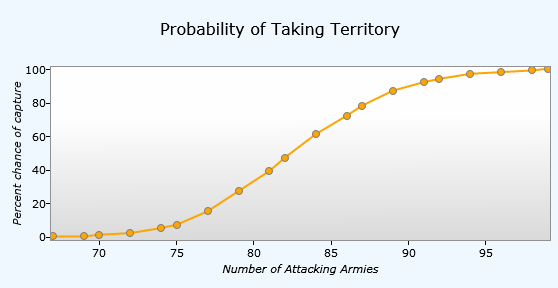
The probability graph shows you percent change you have to capture a territory based on how many armies you attack with. In this example, we have entered that the defender has 50 armies. To be 80% sure that we capture a territory that has 50 armies, we look at the graph where the vertical axis reads 80. This corresponds to about 87 armies.
You can hover over each circle on this graph to clarify what that point in the graph means.
Army Loss Graph

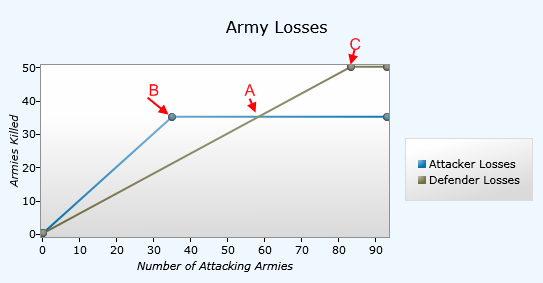
The army loss graph shows you how many armies each player will lose based on how many armies you attack with. In this example, we have entered that the defender has 50 armies.
Take note of point A where the lines cross. This is the point where the defender loses the same number of armies as the attacker. In other words, an attack with this number of armies won't favor either player. Everything to the right (more attacking armies) is beneficial to the attacker, and everything to the left (fewer attacking armies) is beneficial to the defender.
Point B is the point that is most beneficial to the defender. At this point, the defender kills all of the attacking armies while losing far fewer.
Point C is the point that is most beneficial to the attacker. At this point, all of the defending armies are killed and the territory is captured. Adding more armies beyond this won't impact the result.
Notes
- Both graphs are affected by the offense and defense kill rates set for the game you are looking at. The top graph is also affected by the luck percentage set for the game. Therefore, you cannot assume that the numbers you see in one game will hold true for another game since the settings may be different.
- The data presented is not affected by which territories were selected when it was opened, other than to default the defending armies text box at the top.
- The Army Loss graph presents the most likely outcome of the attack. The actual outcome may be off based on the random factor, but since that's impossible to predict it's logical to assume that the most likely outcome is what will happen when forming your plans.
- The Probability graph is generated by running the attack thousands of times for each scenario. Therefore, the numbers could change slightly from one run to the next. However, they are typically only off by one percent at most.
- Astute players will notice that the probability graph dips a bit where the number of attacking armies equals the number of defending armies. This is most easily seen when the number of defenders is 1 or 2. This is not a glitch and does indeed reflect the true probability. This is due to an edge case in the combat system. If equal numbers fight and both sides kill the maximum number of armies possible, and since every territory must have at least one army, there would be no armies left to control the captured territory. In this event, WarLight simply resurrects one defending army and allows it to retain control of the territory. For this reason, it's rarely a good idea to attack a 1 with 1 or to attack a 2 with 2, etc.